
Many shooters are familiar with the term of a free floated barrel. For those how are not, let me explain.
A free floated barrel is a technique used to enhance the accuracy and consistency of a rifle by eliminating any barrel to stock contact. In actual practice, many find that a precision glass bedded rifle receiver that includes the chamber area of the barrel in combination with free floating of the rest of the barrel is the best way to accuracy bliss.
The reason for the free floated barrel is to provide shot-after-shot consistency by allowing the barrel to react exactly the same way every time. Stocks, in particular non-laminated wood stocks can change dimensionally from humidity and heat, so keeping the barrel away from that variable makes a good deal of sense.
Now, keep the free floated barrel concept in the back of your brain for a few moments, and I want to now change gears and talk about the BIG BANG theory.
First we need to understand how long it takes the bullet to twist down the barrel.
For purposes of this discussion, I will use a typical 30-06 class of firearm with the following assumptions.
 |
| Big Bang Time Chart |
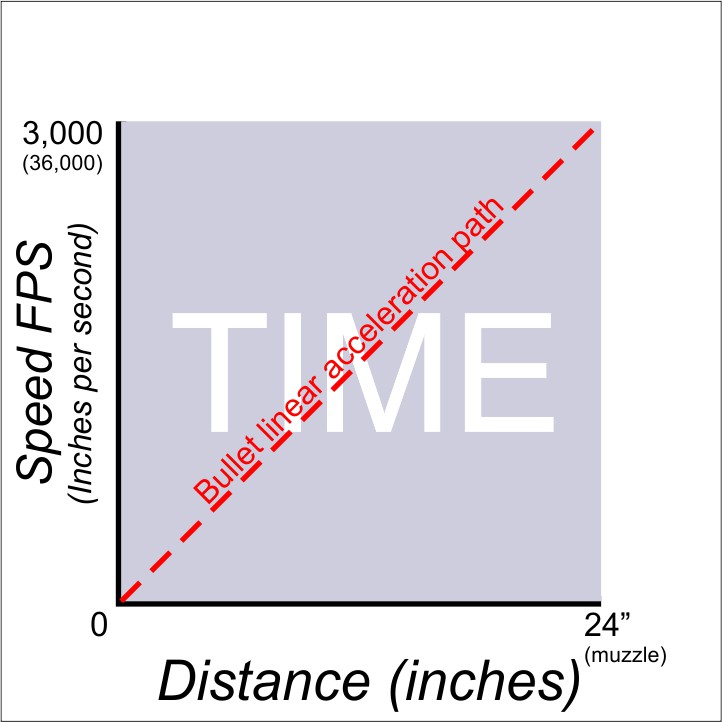
This chart helps us understand the Big Bang Barrel time as a relationship between speed and distance. Using the 3,000 fps, we first need to normalize this to ips (inches per second) by multiply 3,000 by 12 we get 36,000ips.
Next we ask this fundamental question. If the bullet is traveling 36,000ips, how long does it take to travel 24 inches? And this equation answers this question. 1/36,000 = X / 24. Solving for X results in .00066666 of a second.
Now the bullet does not start a 36,000ips in the barrel chamber, it starts at zero. So lets assume that there is a linear acceleration path. So the bullet actually spends twice as much time in the barrel when starting from zero IPS and reaching 36,000IPS in 24 inches, hence we double the X result to get .0013, or 1.33 millisecond.
Next lets us consider what happens during this 1.33ms. Sir Isaac Newton gave us “three Laws of Motion”. The third law is the law of reaction, sometimes stated as "to every action there exists an equal and opposite reaction”. In our scenario, the accelerating bullet pushes back against the firearm and bruises our shoulder!
So where am I going with this. Consider this. If a rifle was designed such that the recoil pad and your shoulder was dead center on the center line of the rifle bore, all the push be be in exactly the opposite direction of the bullet path. In other words, straight back with no muzzle lift. But we know that your shoulder is below the center line of the rifle bore, acting as a kind of eccentric pivot point. Hence when the rifle pushes back, the rifle pivots on your shoulder and the muzzle of the barrel has to rise. All this in 1.33ms!
If you don't believe this, take a look at a fine trap shotgun, like a Perazzi, Krieghoff or Guerini. These shotguns are designed so the barrel is as low in the mono block as physically possible. They also have tall ribs and flat stocks. All in an order to get your shoulder in line with the center line of the barrel. Shooting one of these guns is amazing, because the is very little muzzle lift, and you can see the clay target break!
Unfortunately our rifles are not designed like a trap shotgun, so we have to consciously manage this 1.33ms and the muzzle rise during this time. This is one of biggest reasons why the intense focus on the goal of ultra light weight is emphasized in the SnipePod V2 design. Any added weight on the front of your rifle will slow down the muzzle rise during the Big Bang 1.33ms and make you shoot lower! At just 5 ounces SnipePod V2 has minimal influence on muzzle rise.
Some shooters like to grab on to the front of their rifle or hang on to the bipod. Bad technique. This is like adding weight, and worse, it is a variable added weight. From shot to shot, it is almost impossible to exert the exact same weight or down force with your arm.
I am a big proponent of NOT TOUCHING the front of my rifle during the BIG BANG. I practice a shooting technique called “Free Floating the Rifle”. In other words, I try to shoot in manner which allows the rifle to recoil in a consistent manner from shot to shot. I try not to alter the recoil of the rifle during the all important .1.3ms. Taking it a step further, I actually grip the rear of the rifle very lightly, with just enough of a hold on the pistol grip to provide smooth, consistent trigger pressure, no more, no less.
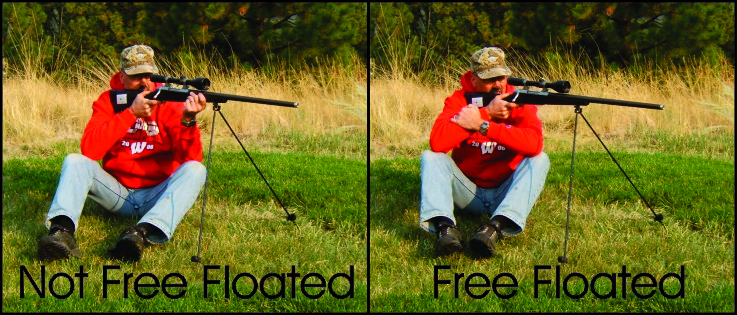
The following pictures depict the contrast between a Free Floated Rifle and a non free floated rifle in the sitting position.
 |
| Big Bang Time Chart |
In my experience, shots taking from the standing position are typically close range, and impromptu. Personally, I would never consider a standing shot beyond 100 yards, and 200 yards with the aid of a SnipePod V2. Based on these factors and the inherit instability of shooting while standing, the issue of free floating the rifle verses non-free floating is a small influence in overall accuracy.
However in the kneeling, sitting and prone positions, where the rear of the rifle can be held with a great degree of stability, the Free Floated Rifle techniques really starts to have a significant positive effect on consistent accuracy. Consider, for a moment, it the difference between the two techniques results in the only 1/32” difference in muzzle lift at moment of bullet muzzle exit. That would result in a 4.69” vertical point of impact change at 100 yards! Now take that out to 200 yards and beyond, and you just missed that big bull elk, or worse, wounded him.
I also have encountered some shooters who swear that by leaning forward and pushing against the legs of a Harris bipod that they improve their accuracy. I can only giggle at such silliness. This technique would obviously have influence on the recoil of the rifle and the rate of rise of the muzzle. How would anyone ever achieve consistency in the amount of pressure?
One negative drawback to the Free Floated Rifle technique is recoil management. This is a case by case issue. For medium size big game hunting (elk, deer, caribou), I use a Christensen Arms – Abolt based - 7mm STW. This rifle weighing just under 8 pounds with a Vortex Viper 3.5-10X50mm scope and a MPI stock. I always shoot this rifle with the Free Floating technique, and the same goes for all my other rifles that are lighter in the recoil area that my STW. However, when I pull out the 375 H&H, I will switch, and lightly grasp the front of the rifle to manage recoil. Considering the fact the my STW is my 600 yard bean field rifle, and the 375 is my 200 yard brush buster, the two different techniques are appropriate for the application.
Now that we have learned to get our hands off the front of our rifle during the Big Bang, what should we do with it? Read on...
The SnipePod V2 will lock the front of your rifle in on a horizontal and vertical plane. Great, but what about the shooter on the back of the gun. I still fight the sway of my body and this constant fight is why the cross hairs refuse to stop on the target.
To solve this I take my left hand and use it to improve the weakest part of the shooting equation, that is me on the back of the gun.
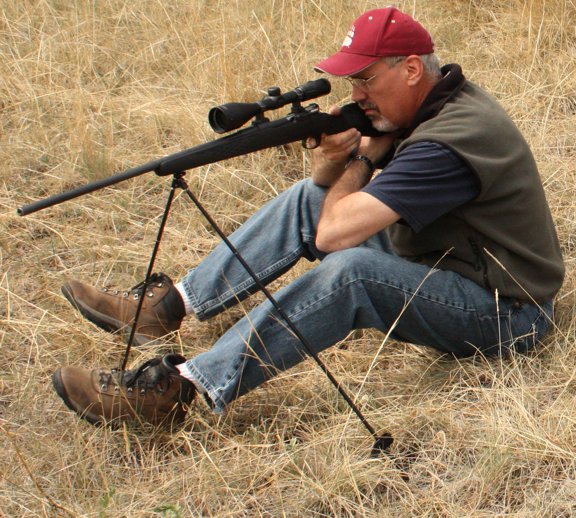
Imagine you are in the sitting position with your rifle. Now image you are looking down from above (See birds eye view) at your position. Next draw an imaginary line that is perpendicular to the line of your rifle, and touches the recoil pad.
In this position, I plant of my right foot into the ground along this imaginary line. I then lay my left leg on the ground and lean forward so all my body weight is on my left butt cheek. Your right butt cheek should be several inches off the ground. Then I place my right elbow on my right knee and last, I straighten my left arm and place my left hand close to this imaginary line. Got that? Check out the following pictures to help visualize.
| Kramer's SnipePod V2 Sitting Technique | ||
|---|---|---|
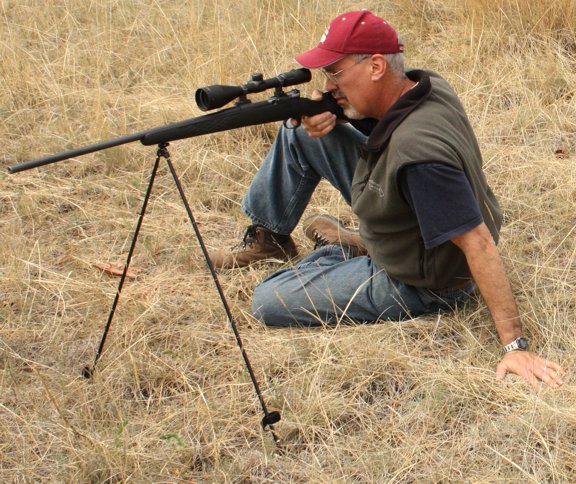 | 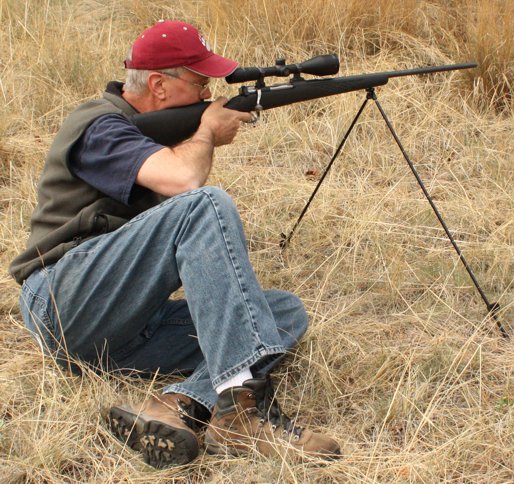 |  |
This shooting position builds a strong triangular bone-on-bone structure on the back of the rifle. Very little muscle tension is required, and it is a position that can be deployed in very steep mountain terrain. The difference between a conventional sitting position
 |
| Conventional Sitting Position |
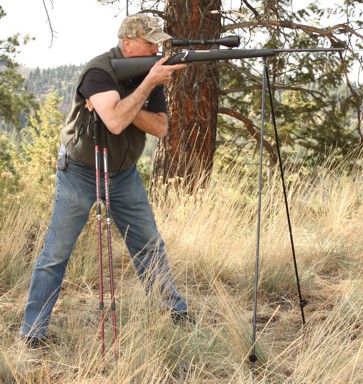
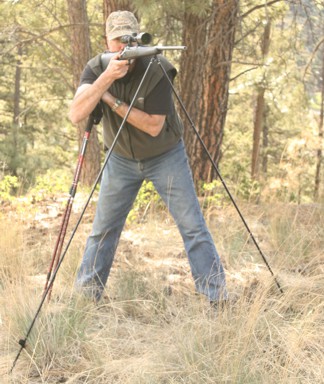
As mentioned earlier, the standing position has limitations, but that does not mean that it can not be improved. The following pictures show how using a set of treking poles, I can triangulate my upper body with the ground and greatly reduce that annoying cross hair float. Any long walking stick will suffice.
| Kramer's Standing Technique | ||
|---|---|---|
 |  | |
Precision long range shooting has many aspects. Understanding the BIG BANG is one of those aspects. But shooting technique, rifle familiarity, load familiarity, and a steady rest need to addressed. The SnipePod V2 was designed to meet the demands of hunting. Much lighter and far more versatile than any other bipod or shooting stick. It simply works better!